")


Cleaning your vinyl records is essential for maintaining their sound quality and longevity. In this guide, we’ll walk you through how to clean your vinyl step by step, ensuring you get the best possible hi-fi experience.
From gathering the right tools to applying the best cleaning techniques, we’ll cover everything you need to know to keep your records in tip-top condition.
What do I need to clean vinyl records?
| Pro-Ject Wash-IT II Vinyl Cleaning Fluid | Removes any grit and dirt that could be embedded in your vinyl. | Check the current price |
| AudioQuest Conductive Carbon Fibre Record Cleaning Brush | Uses carbon fibre bristles to gently remove any dust without leaving any scratches. | Check the current price |
| Acc-Sees Anti-static Cleaning Cloth | Erases anti-static properties to help improve your record playback. | Check the current price |
| Lenco 5-in-1 Record Cleaning Kit | A great value-for-money option if you want a cleaning solution, cloth, antistatic brush, stylus brush, and a record pouch in one convenient package. | Check the current price |
| Pro-Ject VC-E 2 Compact Record Cleaning Machine | Includes Wash it 2 cleaning solution and has strong suction power to remove any impurities with a touch of a button. | Check the current price |
How to clean your vinyl records
The easy way
 It may sound obvious, but regularly cleaning your vinyl records is key to maintaining their quality. An anti-static cleaning kit is ideal for everyday use. These kits typically include a brush, cleaning cloth, and a cleaning solution.
Daily cleaning helps dissipate static, which can attract dust and debris, so it’s a good idea to incorporate a simple routine that ensures your records are kept free from any dirt that could affect sound quality.
Consistent maintenance not only preserves the integrity of the vinyl but also ensures your turntable’s stylus encounters a smooth surface, reducing unnecessary strain.
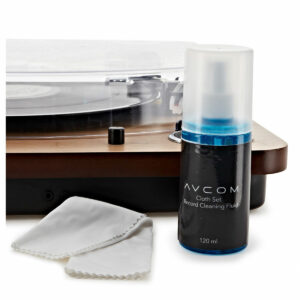
Our picks would be the AVCOM Cloth and Fluid Record Cleaning Set, AM Clean Sound Record Cleaner Set, and the Lenco 5-in1 Record Cleaning Kit. You may even want to invest in a specialised antistatic slipmat, so you can keep dust and grit off your records as they rotate.
With a machine
Probably the most efficient and effective way of keeping your vinyl clean is via a vacuum-based record cleaner. They can get rid of all those embedded bits of dirt and grit that are often hard to get at when using manual cleaning tools.
When operating a vacuum-based cleaner, start by applying the cleaning solution to the record. Place the record on the machine’s platter and secure it. Turn on the vacuum, and the machine will spin the record while the suction removes dirt and liquid.
We suggest the Pro-Ject VC-E2, VC-S3, and the Okki Nokki ONE Record Cleaning Machine as they offer a reliably consistent cleaning performance. While a vacuum cleaning system may be costlier than other methods, the results are worth it if you’re an audiophile or DJ who wants to preserve the quality of your vinyl.
For a more budget-friendly option, you can go with the more manual option of record washers.
To use a record washer, like the Spin Clean Vinyl Cleaning System, first fill the basin with the recommended cleaning solution. Insert your record between the brushes. Rotate the record by hand, ensuring it completes a few full turns. The brushes and solution will work together to remove dirt and grime. Once done, let the record air dry or use a microfiber cloth to carefully dry it.
Thoroughly by hand
1. Brush the record & remove static
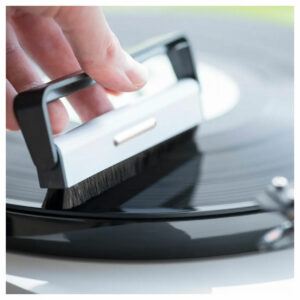 Start by using an anti-static record brush to remove surface dust and dirt. The Pro-Ject Brush-IT or AudioQuest Conductive Carbon Fibre Record Cleaning Brush are both reliable options.
Gently hold the brush on the record’s surface and move it in a circular motion, following the grooves, to sweep away particles. Avoid using too much pressure, as this could damage the grooves.
Next, take a clean microfibre cloth and wipe the record gently in a circular motion. This step helps remove any remaining dirt and reduces static build-up, ensuring your vinyl is thoroughly clean and ready for play.
2. Inspect the record
After brushing your vinyl, it’s crucial to inspect it thoroughly. Use good lighting to examine the surface for fingerprints, grease, or smudges. Rotate the record to catch the light at different angles, revealing any missed dirt.
Some problem areas might require multiple cleanings before they’re fit to play. Carefully inspect the records so you know what needs extra attention.
Keep in mind that you should always clean used vinyl before playing it. Hidden dirt can damage your needle, so take the time to do a proper inspection and cleaning. This extra step ensures your records stay in the best possible condition.
3. Use the cleaning solution
 To clean your vinyl records safely, begin by placing your record on a soft, clean surface. Then apply only a few drops of quality cleaning solution. Our choice would be the Pro-Ject Wash-IT II Vinyl Cleaning Fluid for its ability to dissolve any impurities on records.
Remember, you should never use water and soap to clean records as this can cause damage and leave residue.
You can then use the brush to spread the cleaning solution around the vinyl. Lightly brush in circular motions, following the grooves with very little pressure, to ensure thorough cleaning without damaging the vinyl.
4. Dry the vinyl record
Drying your vinyl record is crucial to prevent damage. Start by gently patting the record dry with a soft microfiber cloth. The Acc-Sees Anti-static Cleaning Cloth works really well for this task.
Be careful to avoid getting any moisture on the inner label. After patting, you should let the record air dry on a clean surface for up to thirty minutes.
Needless to say, you should always ensure your record is fully dry before sliding it back into its sleeve as this prevents mould and potential damage. For further protection, you may want to get your hands on an antistatic inner record sleeve.
Why do I need to clean my vinyl?
Vinyl records gather dust and grime very easily as the static electricity they generate attracts particles from the air. Plus, every time you handle your records, natural oils from your hands can transfer onto the surface, further accumulating dirt.
Cleaning your vinyl records is essential for several reasons. Firstly, it extends their lifespan. Dust and grime can cause micro-abrasions that gradually degrade the quality of the record. By keeping them clean, you ensure they remain in good condition for years to come.
Secondly, cleaning your records improves playback. Dirt and debris can cause pops, clicks, and skips during playback. A clean record provides a smoother, more enjoyable listening experience with clearer sound quality.
Finally, maintaining clean records prevents your needle from getting worn. Dust and grime can accumulate on the needle, causing it to wear out faster and potentially damaging your records. Regular cleaning helps protect both your records and your equipment, ensuring you get the best performance from your setup.
FAQs
What’s the best way to clean vinyl records?
The best way to clean vinyl records is by using a dedicated record-cleaning solution and a microfiber cloth. These specialised cleaners ensure dirt and dust are gently removed without damaging the record’s surface. Regular cleaning can enhance sound quality and prolong the life of your records.
How do you clean white vinyl records?
Cleaning white vinyl records requires a soft, lint-free cloth and a gentle vinyl cleaning solution. Avoid using coloured cloths as they might stain the vinyl. Gently wipe in a circular motion, ensuring all dust and grime are removed for optimal playback quality.
Is it OK to clean vinyl records with water?
Cleaning vinyl records with water is not recommended as it can leave residue and promote mould growth. Instead, use a specialized vinyl cleaning solution designed to remove dust and dirt effectively. Proper cleaning solutions ensure no damage to the grooves and maintain audio fidelity.
Final thoughts
We hope you now know how to clean your vinyl and keep your records in great condition! It’s very important for getting the most out of your hi-fi system and ensuring your turntable, its needle, and your records last as long as possible.
Keep in mind that using the right tools and techniques makes all the difference.
To learn more about vinyl, check out our guides on how to play your records, choosing which turntable best suits you, and the best turntables under £500.


0 Comments